Employee Setup
Employee Setup ဆိုတာဘာလဲ?
၀န်ထမ်းများနှင့် သက်ဆိုင်သော ကိုယ်ရေးကိုယ်တာအချက်အလက်များကို သတ်မှတ်ခြင်းနှင့် စီမံခန့်ခွဲခြင်းများ၊ အခြားသော အတည်ပြုခြင်းဆိုင်ရာ လုပ်ဆောင်ချက်များကို သတ်မှတ်ပေးရသည့်နေရာဖြစ်ပါသည်။
၀န်ထမ်းအသစ် ထည့်ရန် ဘာတွေလိုအပ်မလဲ ?
In System: Open the Global HR Cloud Web URL in Web Browser
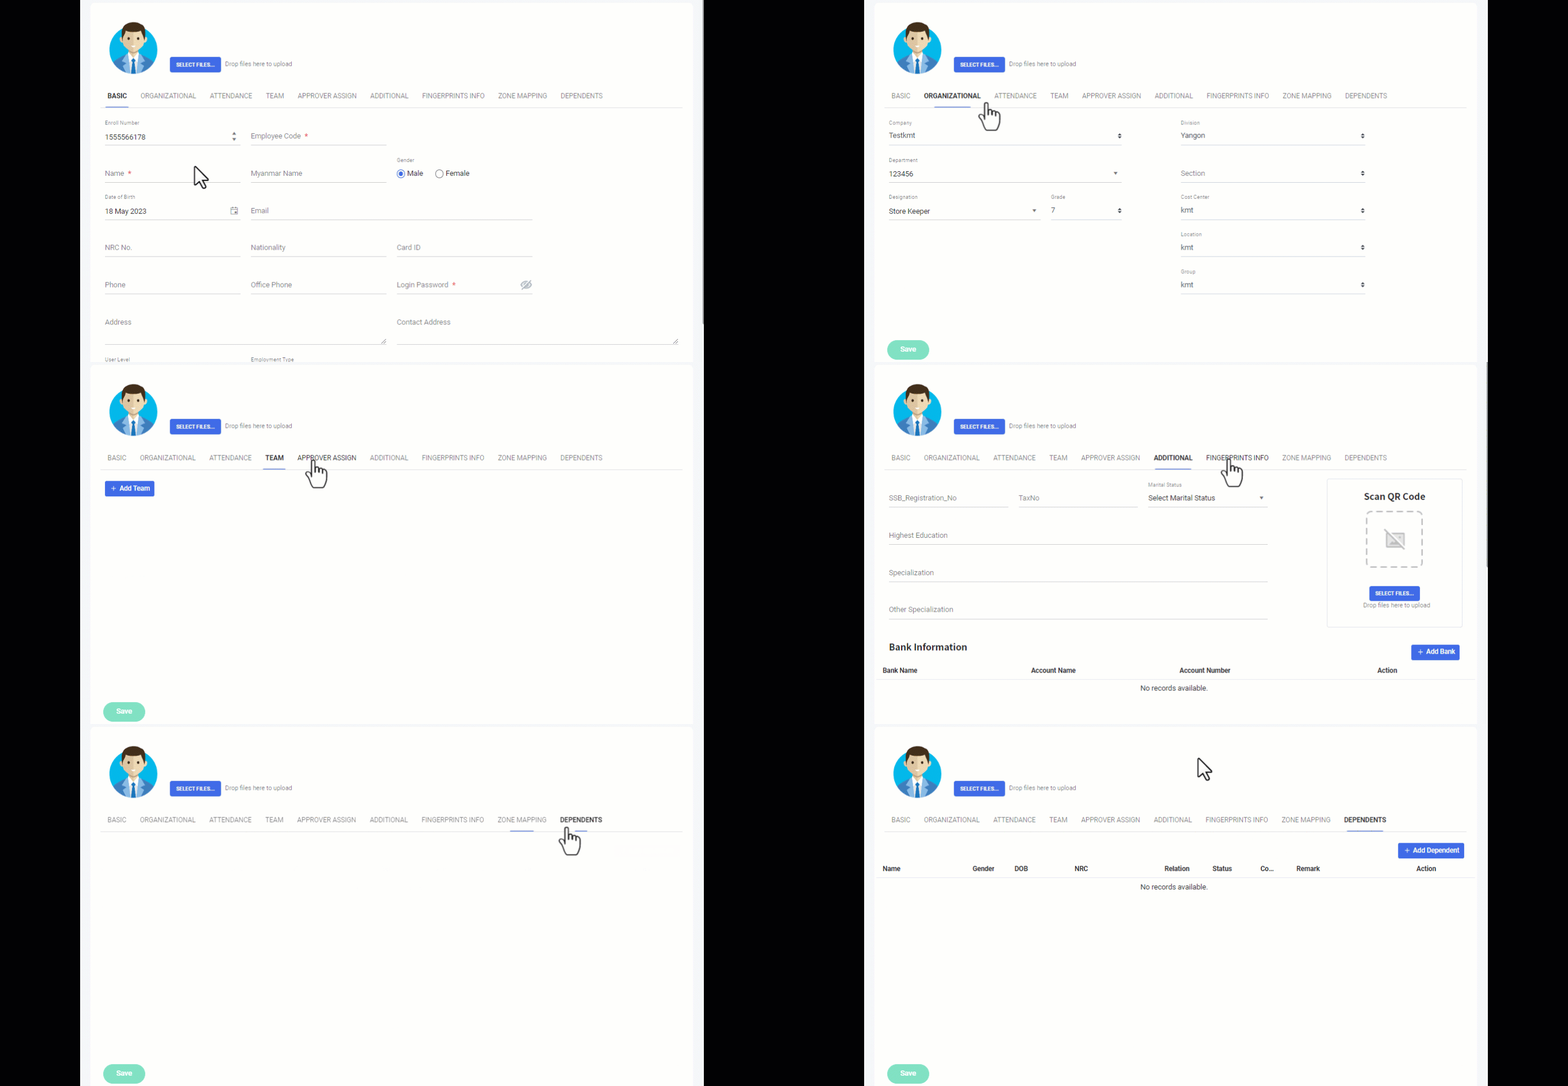
Go to Employee>> Employee Setup form တွင် ပါ၀င်သော Tab Menu Lists –
- BASIC
- ORGANIZATIONAL
- ATTENDANCE
- TEAM
- APPROVER ASSIGN
- ADDITIONAL
- FINGERPRINTS INFO
- ZONE MAPPING
- DEPENDENTS
1.BASIC
Enroll Number
၀န်ထမ်း ကို သတ်မှတ် ပေးထားသော ၀န်ထမ်းနံပါတ်စဥ်များ လိုအပ်ပြီး အကယ်၍ Fingerprint Device များမှ သတ်မှတ်ထားသည့် နံပါတ်ရှိပါက ထိုနံပါတ်ကို System ရှိ Enroll Number တွင် ထည့်သုံးရမည် ဖြစ်ပါသည်။
(Remark: သုညနဲ့ စလို့မရပါ။ နံပါတ်စဥ်များတူလို့မရပါ။ English Alphabet (A,B,C,D,E,F,..etc) များ ထည့်လို့မရပါ။)
Sample: 1000, 1001,..။
Employee Code
Software သို့ ၀င်ရောက်နိုင်မည့် ၀န်ထမ်းကုတ်(Employee code) တစ်ခုကို မဖြစ်မနေ သတ်မှတ်ရန် လိုအပ်ပြီး Enroll Number အတိုင်း သုံးလို့ရနိုင်သလို မိမိ တို့ စိတ်ကြိုက် English Alphabet (A,B,C,D,E,F,..etc) များနှင့် တွဲသုံးလို့ရပါသည်။
(Remark: ၀န်ထမ်းကုတ်နံပါတ်များ တူလို့မရပါ။)
Sample: Mm10001, Ygn20001,…။
Name, Myanmar Name, Gender, Date of Birth, Email, NRC No., Nationality, Card ID, Phone, Office Phone, Address, Contact Address, Employment Type
၀န်ထမ်းကိုယ်ရေးကိုယ်တာ အချက်အလက်များဖြစ်သည့် Name, Myanmar Name, Gender, Date of Birth, Email, NRC No., Nationality, Card ID, Phone, Office Phone, Address(နေရပ်လိပ်စာ), Contact Address(လက်ရှိ ဆက်သွယ်ရန်လိပ်စာ), Employment Type(အလုပ်ခန့်သည့် အမျိုးအစား) များကို ဖြည့်ရမည် ဖြစ်ပါသည်။
(Remark: System တွင် မဖြစ်မနေ ဖြည့်ရမည့် နေရာများကို တော့ Star အနီရောင်လေးနဲ့ ဖော်ပြထားမည်ဖြစ်ပါသည်။ အကယ်၍ မပြည့်မစုံ ဖြစ်နေပါက Save Button မှာ မှိန်နေမည်ဖြစ်ပါသည်။)
Login Password
Login Password ဆိုသည်မှာ Software system ထဲသို့ ၀င်ရောက်လို့ရမည့် Password ကို ၀န်ထမ်းအသစ် အတွက် သတ်မှတ်ပေးသည့် နေရာဖြစ်ပါသည်။ မဖြစ်မနေ ထည့်ရန်လိုအပ်ပါသည်။
(Remark: ထို Password သည် Mobile Application/Web အသုံးပြုရာတွင် အစကနဦး ထည့်သွင်း အသုံးပြုရမည် ဖြစ်ပြီး System ထဲ၀င်လိုက်ပြီးဆိုပါက ၀န်ထမ်းမှ မိမိ ကြိုက်နှစ်သက်ရာ Password ကိုချက်ချင်း ပြန်ပြောင်းရမည်ဖြစ်ပါသည်။ Password ပြောင်းပြီး နောက်တစ်ကြိမ် Log in ၀င်သည့် pageသို့ ပြန်ရောက်သွားပါက မိမိပြောင်းလိုက်သည့် Password နှင့် ပြန်၀င်ရမည်ဖြစ်ပါသည်။)
User Level
User Level ဆိုသည်မှာ Software System ကို အသုံးပြုခွင့် ပေးထားသည့် Level Role များကို ရွေးချယ်လို့ ရသည့် နေရာဖြစ်ပါသည်။ မဖြစ်မနေ ရွေးချယ်ရန်လိုအပ်ပါသည်။
(Tip: User Level အကြောင်းအသေးစိတ်သိရှိလိုပါက https://www.globalhr.com.mm/support/userlevelcontrol/ တွင် ၀င်ရောက် လေ့လာနိူင်ပါသည်။)
2.ORGANIZATIONAL
Master Setup – Basic Menu များကို အရင်တည်ဆောက်ထားမှသာ ၀န်ထမ်းအချက်အလက်များ ထည့်သွင်းလျှင် အဆင်သင့်ရွေးချယ်နိုင်မည်ဖြစ်ပါသည်။
Company
Company Profile ဆိုသည်မှာ Company နာမည်တည်ဆောက်ရတဲ့ နေရာဖြစ်ပြီး ထိုနေရာတွင် Company လိပ်စာ၊ လုပ်ငန်းအမျိုးအစား၊ အခြားသက်ဆိုင်သောInformation data များအပြင် Leave Period, Budget Period နဲ့ Payment duration များကိုလည်း သတ်မှတ်လို့ရပြီ Pay slip format design ကို လည်း Company profile မှ သတ်မှတ်လို့ရနိုင်မည်ဖြစ်ပါသည်။
Division
Division ဆိုသည်မှာ မိမိ Company မှာ ကနဦးရှိပြီးသား နာမည်များကို ဆောက်လို့ရနိုင်သလို အကယ်၍ အသစ်စ ဆောက်ချင်ပါက လုပ်ငန်းသဘာ၀ပေါ် မူတည်ပြီး မိမိ လိုချင်တဲ့ နာမည်ကို ဆောက်လို့ရသည့် နေရာဖြစ်ပါသည်။
Department
Department ဆိုသည်မှာ ၀န်ထမ်းများအတွက် သတ်မှတ်ပေးထားသော ဌာနနေရာနာမည်များဖြစ်ပြီး Company profile name အောက်တွင် Tree View ပုံစံနဲ့ မြင်ရမည်ဖြစ်ပြီး Organization structure ဆိုတဲ့ နေရာတွင် ကြည့်လို့ရနိုင်မည်ဖြစ်ပါသည်။
Designation
Designation ဆိုသည်မှာ ၀န်ထမ်းများအတွက် သတ်မှတ်ထားသော ရာထူးအမည်များကို တည်ဆောက်သည့် နေရာဖြစ်ပါသည်။
Grade
Grade ဆိုသည်မှာ ၀န်ထမ်းများကို သတ်မှတ်ပေးသည့် အဆင့်ဖြစ်ပါသည်။ ထို Grade များသည် တခါတရံကျ Payroll allowance များနှင့် ချိတ်ဆက်သုံးကျပါသည်။
Section
Section ဆိုသည်မှာ မိမိ Company မှာ ကနဦးရှိပြီးသား နာမည်များကို ဆောက်လို့ရနိုင်သလို အကယ်၍ အသစ်စ ဆောက်ချင်ပါက မိမိ ထည့်ချင်သည့် နာမည်ကို သတ်မှတ်လို့ရသည့် နေရာဖြစ်ပါသည်။
ဥပမာအားဖြင့် အချို့ အထည်ချုပ်စက်ရုံများတွင် Cutting ဆိုတဲ့ Department အောက်မှာ Line A , Line B ဆို ပြီး ခွဲထားချင်တာမျိုးဆို Section ကိုသုံးနိုင်ပါသည်။
Cost Center
Cost Center ဆိုသည်မှာ မိမိ Company မှာ ကနဦးရှိပြီးသား နာမည်များကို ဆောက်လို့ရနိုင်သလို အကယ်၍ အသစ်စ ဆောက်ချင်ပါက မိမိ ထည့်ချင်သည့် နာမည်ကို သတ်မှတ်လို့ရသည့် နေရာဖြစ်ပါသည်။
Group
Group ဆိုသည်မှာ မိမိ Company မှာ ကနဦးရှိပြီးသား နာမည်များကို ဆောက်လို့ရနိုင်သလို အကယ်၍ အသစ်စ ဆောက်ချင်ပါက မိမိ ထည့်ချင်သည့် နာမည်ကို သတ်မှတ်လို့ရသည့် နေရာဖြစ်ပါသည်။ ဥပမာအားဖြင့် Management group, Product Group, Service Group စသဖြင့် ခွဲ ခြားသတ်မှတ်လေ့ရှိကြပါသည်။
Location
Location ဆိုသည်မှာ မိမိ Company မှာ ကနဦးရှိပြီးသား နာမည်များကို ဆောက်လို့ရနိုင်သလို အကယ်၍ အသစ်စ ဆောက်ချင်ပါက လုပ်ငန်းတည်ရှိရာနေရာများကို တည်ဆောက်လို့ရသည့် နေရာဖြစ်ပါသည်။
(Remark: Organizational တွင်ပါ၀င်သော Menu များသည် Dropdown list နှင့် ရွေးချယ်ရသော setup menu များဖြစ်တာကြောင့် Manually ရိုက်ထည့်မည်ဆိုပါက menu အချက်အလက်များကို တည်ဆောက်ထားဖို့ လိုပါသည်။)
3.Attendance
Attendance ဆိုသည်မှာ ၀န်ထမ်းအသစ်အတွက် Shift (လုပ်ငန်းတာ၀န်အချိန်အမည်) နှင့်Offday(ပိတ်ရက်) များကို နေ့အလိုက် သတ်မှတ် ပေးရမည့် ဖြစ်ပြီး Group Policy(လုပ်ငန်းမူ၀ါဒ) ကို ရွေးချယ် သတ်မှတ်ပေးရပါမည်။
DOE(Date of Employment) ဆိုတာသည် လုပ်ငန်းသို့ စတင်၀င်ရောက်လုပ်ကိုင်သည့် နေ့ကိုထည့်ရမည် ဖြစ်ပြီး Probation တွင် By Month, By Days ဆိုပြီး အစမ်းခန့်ကာလကို ရွေးချယ် သတ်မှတ်နိုင်ပါသည်။
(Remark: Permanent date သည် Probation တွင် ထည့်လိုက်တာပေါ်မူတည်ပြီး ပြောင်းသွားပါမည်၊)
4.TEAM
Team ဆိုသည်မှာ ၀န်ထမ်းအသစ်နှင့် သက်ဆိုင်သည့် အသင်းအဖွဲ့များ သို့မဟုတ် သီးခြား လုပ်ဆောင်နေသည့် လုပ်ငန်း Project များရှိပါက ချိတ်ဆက်ပေးရမည် ဖြစ်ပါသည်။
5.APPROVER ASSIGN
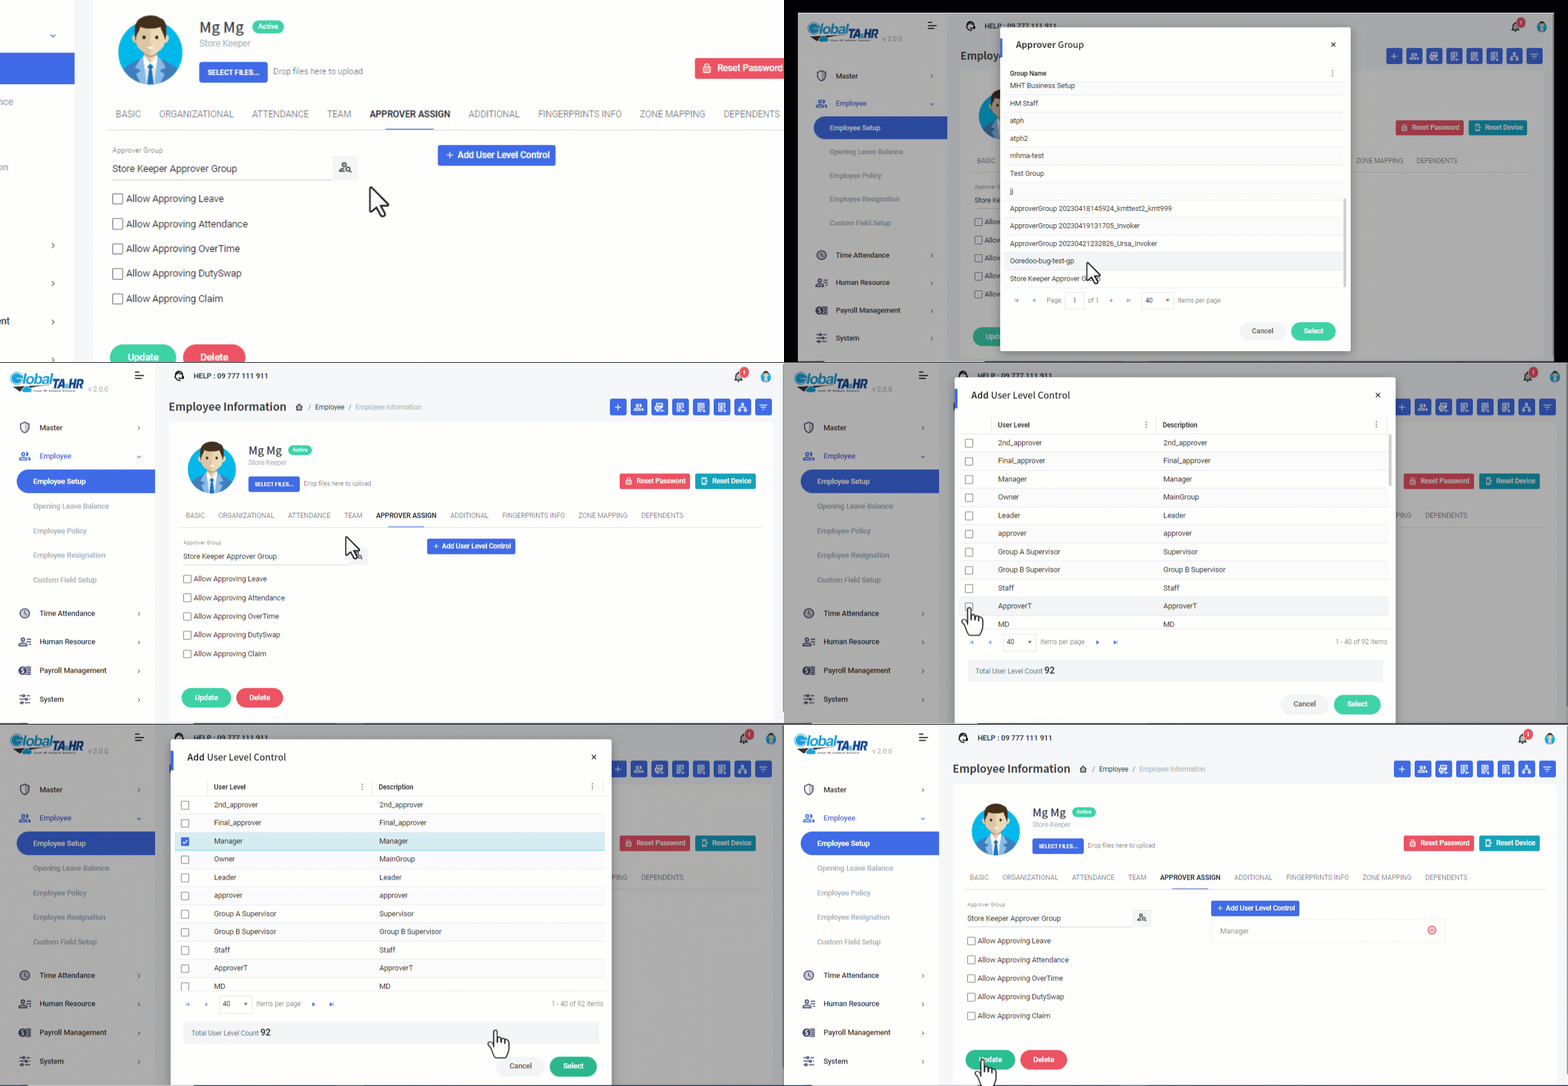
Approver Assign ဆိုသည်မှာ ၀န်ထမ်းအသစ်အတွက် လုပ်ငန်းတာ၀န်ချိန်များ /ခွင့်ယူရက်များ/ အချိန်ပိုများ ကို တာ၀န်ယူ ခွင့်ပြုပေးမည့် အတည်ပြုသူများကို ရွေးချယ်ထည့်ပေးရသည့်နေရာဖြစ်ပါသည်။
Normal Level ဆိုလျှင် Add Approver ဆိုပြီး အတည်ပြုသူများကို ရွေးချယ်သတ်မှတ် ရပါမည်၊
Multi Level ဆိုလျှင် တော့ Add Group ဆိုပြီး အတည်ပြုသူများအတွက် ထပ်မံဖွဲ့စည်း ထားသော Group အမည်များကို ရွေးချယ်ရမည် ဖြစ်ပါသည်။
(Tip: Approver setting ကို အသေးစိတ်သိရှိလိုပါက
https://www.globalhr.com.mm/support/approver/ တွင် ၀င်ရောက်လေ့လာနိုင်ပါသည်။)
ထိုအသစ်ထည့်မည့် ၀န်ထမ်းသည် သက်ဆိုင်ရာလုပ်ငန်းတစ်ခုခုတွင် နောက်ဆုံးအတည်ပြုသူဖြစ်နေပါက ထိုသူအတွက်
1.Allow Approving Leave (ခွင့်ရက်များကို အတည်ပြုခြင်း)
2.Allow Approving Attendance (ရုံးတက်ချိန် အ၀င်အထွက်များကို အတည်ပြုခြင်း)
3.Allow Approving OverTime(အချိန်ပိုနာရီများကို အတည်ပြုခြင်း)
4.Allow Approving DutySwap(တာ၀န်ချိန်များ အပြောင်းအလဲကို အတည်ပြုခြင်း)
5.Allow Approving Claim (တောင်းဆိုချက်များကို အတည်ပြုခြင်း)
စသည့် အတည်ပြုခြင်းများကို ရွေးချယ်ပေးရမည်ဖြစ်ပါသည်။
+ Add User Level Control ဆိုသည်မှာ Software System တွင် အသစ်ထည့်လိုက်သော ၀န်ထမ်း ၏ အလုပ်ရုံးတက်ချိန်များ(Attendance, Leave, OT)/ ကိုယ်ရေးကိုယ်တာအချက်အလက်များ(People directory) / အတည်ပြုခြင်းဆိုင်ရာ လုပ်ဆောင်သည့် ကိစ္စများ(Approve) ကို ကြည့်ရှု ပြင်ဆင် အတည်ပြုနိူင်သူများ(Approver, Supervisor,Manager,CEO., etc..)၏ Software system အသုံးပြုခွင့် User Level Role Name များကို ရွေးချယ်လို့ ရမည်ဖြစ်ပါသည်။
Sample Video: For Adding Normal Level
Sample Video: For Adding Multi Level
6.ADDITIONAL
Additional ဆိုတာတွင်
1.SSB Registration No(လူမှုဖူလုံရေး မှတ်ပုံတင်နံပါတ်),
2.TaxNo(အခွန် မှတ်ပုံတင်နံပါတ်),
3.Marital Status (အိမ်ထောင်ရေးအခြေအနေ) > Single/Marrried/Divorced
4.Highest Education(ပြီးမြောက်ခဲ့သည့် ပညာရေး),
5.Specialization(အထူးကျွမ်းကျင်သည့် ပညာရပ်),
6.Other Specialization(အခြားအထူးကျွမ်းကျင်သည့် ပညာရပ်), များကို ဖြည့်လို့ရမည်ဖြစ်ပါသည်။
Bank Information ဆိုတာတွင် Add Bank မှ Setup ချထားသည့် Bank များကို ရွေးချယ်လို့ ရမည်ဖြစ်ပြီး Account Name နှင့် Account Number များကိုတော့ ရိုက်ထည့်ရမည်ဖြစ်ပါသည်၊
Custom Field Name, Field Value ဆိုတာတွင် ၀န်ထမ်းများနှင့် သက်ဆိုင်သော အချက်အလက် ခေါင်းစဥ် များကို စိတ်ကြိုက် သတ်မှတ်ထားပါက ထိုသတ်မှတ်ထားသည့် ခေါင်းစဥ်များကို ရွေးချယ်လို့ရသည့် နေရာဖြစ်ပါသည်။
7.FINGERPRINTS INFO
FINGERPRINTS INFO ဆိုတာတွင် သတ်မှတ်ထားသည့် လက်ဗွေစက်များကို ရွေးချယ်လို့ ရသည့်နေရာဖြစ်ပါသည်။
8.ZONE MAPPING
ZONE MAPPING ဆိုတာတွင် သတ်မှတ် ထားသည့် အလုပ်ချိန် မှတ်တမ်းတင်လို့ရသော လုပ်ငန်းတည်နေရာများ ကို ရွေးချယ်လို့ ရသည့်နေရာဖြစ်ပါသည်။
9.DEPENDENTS
Dependents ဆိုတာသည် ၀န်ထမ်းနှင့် ပတ်သတ်သော အိမ်ထောင်စု မှီခို စာရင်းများကို ထည့်သွင်းလို့ ရသည်နေရာဖြစ်ပါသည်။
(Tip: Personal Income Tax တွက်ရာတွင် Dependent allowance များကို ယခု နေရာမှ အချက်အလက်များဖြင့် တွက်ချက်သွားမည်ဖြစ်ပါသည်။)
Employee Information Form:
၀န်ထမ်းအသစ်ထည့်ဖို့ မဖြစ်မနေ ထည့်ဖို့ ဘာတွေလိုအပ်မလဲ?
Software System တွင် မဖြစ်မနေလိုအပ်သည့် ခေါင်းစဥ်များဖြစ်သည့် Employee Code, Name, Login Password, User Level, DOB, DOE များကို သတ်မှတ် လိုက်ပါက Software system ရှိ Attendanceပိုင်းနှင့် သက်ဆိုင်သည် Function များကိုတော့ ၀င်ရောက် အသုံးပြုလို့ ရနိုင်မည်ဖြစ်ပါသည်။
၀န်ထမ်း အချက်အလက်များ အပြည့်အစုံမရှိသေးတာကြောင့် ရာထူးများ၊ ဌာနများ၊ တခြားသော အချက်အလက်များသည် Default ဖြစ်သော နာမည်များနှင့် ချိတ်ဆက်နေမည်ဖြစ်ပါသည်။
(Remark : ဘယ်လို မျိုး တည်ဆောက်လို့ရတယ်ဆိုတာ ကို Log In Setup တွင် ကြည့်လို့ရနိုင်ပါသည်။)
Organizational: Master Setup- Basic Menu များ
Master Setup – Basic Menu များကို အရင်တည်ဆောက်ထားမှသာ ၀န်ထမ်းအချက်အလက်များ ထည့်သွင်းလျှင် အဆင်သင့်ရွေးချယ်နိုင်မည်ဖြစ်ပါသည်။
Company(ကုမ္ပဏီ နာမည်)
Company Profile ဆိုတာတွင်တွင် Company နာမည်တည်ဆောက်ရတဲ့ နေရာဖြစ်ပြီး ထိုနေရာတွင် Company လိပ်စာ၊ လုပ်ငန်းအမျိုးအစား၊ အခြားသက်ဆိုင်သောInformation data များအပြင် Leave Period, Budget Period နဲ့ Payment duration များကိုလည်း သတ်မှတ်လို့ရပြီ Pay slip format design ကို လည်း Company profile မှ သတ်မှတ်လို့ရနိုင်မည်ဖြစ်ပါသည်။
Division(လုပ်ငန်း အဖွဲ့အစည်း)
Division ဆိုတာတွင် မိမိ Company မှာ ကနဦးရှိပြီးသား နာမည်များကို ဆောက်လို့ရနိုင်သလို အကယ်၍ အသစ်စ ဆောက်ချင်ပါက လုပ်ငန်းသဘာ၀ပေါ် မူတည်ပြီး မိမိ လိုချင်တဲ့ နာမည်ကို ဆောက်လို့ရသည့် နေရာဖြစ်ပါသည်။
Department (တာ၀န်ထမ်းဆောင်ရမည့် ဌာန)
Department ဆိုတာ ၀န်ထမ်းများအတွက် သတ်မှတ်ပေးထားသော ဌာနနေရာနာမည်များဖြစ်ပြီး Company profile name အောက်တွင် Tree View ပုံစံနဲ့ မြင်ရမည်ဖြစ်ပြီး Organization structure ဆိုတဲ့ နေရာတွင် ကြည့်လို့ရနိုင်မည်ဖြစ်ပါသည်။
Designation(ရာထူး)
Designation ဆိုတာ ၀န်ထမ်းများအတွက် သတ်မှတ်ထားသော ရာထူးအမည်များကို တည်ဆောက်သည့် နေရာဖြစ်ပါသည်။
Grade(အဆင့်)
Grade ဆိုတာ ၀န်ထမ်းများကို သတ်မှတ်ပေးသည့် အဆင့်ဖြစ်ပါသည်။ ထို Grade များသည် တခါတရံကျ Payroll allowance များနှင့် ချိတ်ဆက်သုံးကျပါသည်။
Section(လုပ်ငန်း အပိုင်း)
Section ဆိုတာတွင် မိမိ Company မှာ ကနဦးရှိပြီးသား နာမည်များကို ဆောက်လို့ရနိုင်သလို အကယ်၍ အသစ်စ ဆောက်ချင်ပါက မိမိ ထည့်ချင်သည့် နာမည်ကို သတ်မှတ်လို့ရသည့် နေရာဖြစ်ပါသည်။
ဥပမာအားဖြင့် အချို့ အထည်ချုပ်စက်ရုံများတွင် Cutting ဆိုတဲ့ Department အောက်မှာ Line A , Line B ဆို ပြီး ခွဲထားချင်တာမျိုးဆို Section ကိုသုံးနိုင်ပါသည်။
Cost Center(လုပ်ငန်း ဌာနကုန်ကျစရိတ်များထုတ်ယူရသည့်နေရာ)
Cost Center ဆိုတာတွင် မိမိ Company မှာ ကနဦးရှိပြီးသား နာမည်များကို ဆောက်လို့ရနိုင်သလို အကယ်၍ အသစ်စ ဆောက်ချင်ပါက မိမိ ထည့်ချင်သည့် နာမည်ကို သတ်မှတ်လို့ရသည့် နေရာဖြစ်ပါသည်။
Group(လုပ်ငန်း အုပ်စု)
Group ဆိုတာတွင် မိမိ Company မှာ ကနဦးရှိပြီးသား နာမည်များကို ဆောက်လို့ရနိုင်သလို အကယ်၍ အသစ်စ ဆောက်ချင်ပါက မိမိ ထည့်ချင်သည့် နာမည်ကို သတ်မှတ်လို့ရသည့် နေရာဖြစ်ပါသည်။ ဥပမာအားဖြင့် Management group, Product Group, Service Group စသဖြင့် ခွဲ ခြားသတ်မှတ်လေ့ရှိကြပါသည်။
Location(လုပ်ငန်း တည်နေရာ)
Location ဆိုတာတွင် မိမိ Company မှာ ကနဦးရှိပြီးသား နာမည်များကို ဆောက်လို့ရနိုင်သလို အကယ်၍ အသစ်စ ဆောက်ချင်ပါက လုပ်ငန်းတည်ရှိရာနေရာများကို တည်ဆောက်လို့ရသည့် နေရာဖြစ်ပါသည်။
Select files.. ဆိုသည့်နေရာများတွင် ၀န်ထမ်းကိုယ်ရေကိုယ်တာ အချက်အလက်ဖိုင်များ ထည့်လို့ရနိုင်ပါသလား?
Employee Setup တွင် တွေ့ရသော Select Files များသည်
- ၀န်ထမ်းပရိုဖိုင်ပုံ (Profile Photo)
- Scan QR Code (Covid ကာလအတွင်း ယာယီ အသုံးပြုရန် အတွက်ထည့်ခဲ့သော Option) များ ဖြစ်ကြပါသည်။
ထို့ကြောင့် အခြား PDF file, Word file များကိုတော့ လောလောဆယ် System -Employee Setup တွင် Attachment တွဲလို့ရမည် မဟုတ်ပါ။
၀န်ထမ်းနှင့်သက်ဆိုင်သော အချက်အလက်များကို Software system ထဲသို့ ထည့်သွင်းဖို့ နည်းလမ်း ဘယ်နှမျိုးရှိသလဲ?
ယျေဘူယျအားဖြင့် Software ထဲသို့ မိမိကိုယ်တိုင် အချက်အလက်များကို ရိုက်သွင်းလို့ရပါမည်။
နောက်တနည်းအရ Download Template လုပ်ပြီး Excel တွင် Data များ ဖြည့်ကာ ထို Excel File ကို System ထဲသို့ ထည့်သွင်း(Import Excel)လို့ရမည်ဖြစ်ပါသည်။
Tips: For Icons

![]() – Add New
– Add New
၀န်ထမ်းအသစ်ထည့်မည်ဆိုပါက Add New ဆိုသည့် Button ကို နှိပ်ရပါမည်။
![]() – Go to People Directory
– Go to People Directory
၀န်ထမ်း၏ ကိုယ်ရေးကိုယ်တာ အချက်အလက်များ(Employee Detail List) ကို အသေးစိတ် ဖော်ပြထားသည့်နေရာ ဖြစ်ပါသည်။
![]() – Import
– Import
၀န်ထမ်းအချက်အလက်များ အတွက် ဒေါင်းလုတ်(Download) ဆွဲထားသော File တွင် လိုအပ်သော ၀န်ထမ်းကိုယ်ရေးကိုယ်တာ ဒေတာ(Data)များကို ထည့်ပြီးပါက ယခုနေရာကနေ ၀န်ထမ်းကိုယ်ရေးကိုယ်တာ ဒေတာ(Data) များ ကို ထည့်သွင်းလို့ရနိုင်ပါသည်။
![]() – Import Dependent
– Import Dependent
၀န်ထမ်း၏ အိမ်ထောင်စုမှီခိုအချက်အလက်များအတွက် ဒေါင်းလုတ်(Download) ဆွဲထားသော File တွင် လိုအပ်သော အိမ်ထောင်စုမှီခိုအချက်အလက် ဒေတာ(Data)များကို ထည့်ပြီးပါက ယခုနေရာကနေ ၀န်ထမ်း၏ အိမ်ထောင်စုမှီခိုအချက်အလက် ဒေတာ(Data) များ ကို ထည့်သွင်းလို့ရနိုင်ပါသည်။
![]() – Download Template
– Download Template
၀န်ထမ်းတစ်ယောက် သို့မဟုတ် အများအတွက် တပြိုင်နက်တည်း အချက်အလက်များကို ထည့်သွင်းရနိုင်ဖို့ အရင် ဆုံး Software System မှ Template ဖိုင်ကို ဒေါင်းလုတ်(Download) ဆွဲရပါမည်။
![]() – Download Dependent Template
– Download Dependent Template
၀န်ထမ်းတစ်ယောက်၏ အိမ်ထောင်စုမှီခိုအချက်အလက် သို့မဟုတ် အများအတွက် တပြိုင်နက်တည်း အချက်အလက်များကို ထည့်သွင်းရနိုင်ဖို့ အရင် ဆုံး Software System မှ Template ဖိုင်ကို ဒေါင်းလုတ်(Download) ဆွဲရပါမည်။
![]() – Organization Tree
– Organization Tree
Company နာမည်ကနေ စထားပြီး Department နာမည်များနှင့် စီထားပါသည်။ Tree view ပုံစံအနေနဲ့ရှိပြီး ၀န်ထမ်းဦးရေ နည်းလျှင် သို့မဟုတ် မိမိရှာလိုသည့် ၀န်ထမ်းကို ထိုDepartment များအောက်မှ ရှာလို့ရပါသည်။ ရွေးချယ်လိုပါက နာမည်အရှေ့က ![]() လေးထောင့်ကွက်လေးကို နိုပ် လိုက်လျှင်ရပါသည်။
လေးထောင့်ကွက်လေးကို နိုပ် လိုက်လျှင်ရပါသည်။
![]() – Filter by Employee
– Filter by Employee
Company ၀န်ထမ်းတစ်ဦးတစ်ယောက်မှ စ၍ ၀န်ထမ်းနံပါတ်ဖြင့်/နာမည်ဖြင့်/ဌာနဖြင့်/ရာထူးဖြင့် စသည့်များဖြင့် ဖြစ်စေမိမိလိုချင်သော သူကိုရွေးချယ်ပြီး Select ကို နိုပ် လိုက်လျှင်ရပါသည်။
Create Employee Setup
Go to Left Menu Panel >> Find and Click Employee >> Click Employee Setup
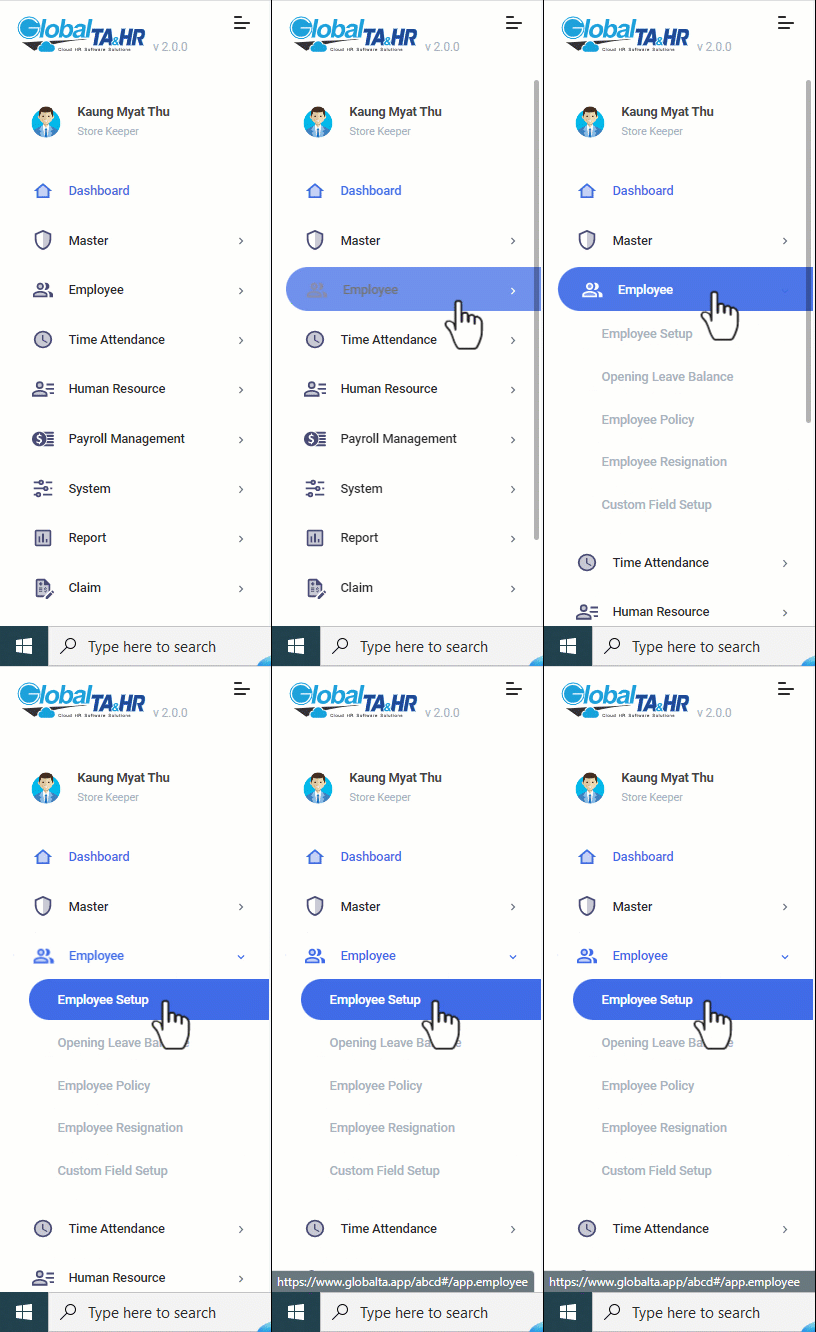
Ways of Add Employee: Single Create & Multi Import
- For Log In Setup : ၀န်ထမ်း တစ်ယောက်ချင်းစီ ကို Attendance နှင့် သက်ဆိုင်သော Function များ စတင်အသုံးပြုနိုင်ဖို့ Initial Data setup တည်ဆောက်ခြင်း။
- For Employee Data Excel Import : Excel ဖြင့် ၀န်ထမ်းတစ်ယောက်ချင်းစီ အပြင် ၀န်ထမ်းအားလုံးအတွက် ကိုယ်ရေးကိုယ်တာအချက်အလက်များ System ထဲသို့ ထည့်သွင်းခြင်း။
- For Dependent Data Excel Import : Excel ဖြင့် ၀န်ထမ်းတစ်ယောက်ချင်းစီ အပြင် ၀န်ထမ်းအားလုံးအတွက် အိမ်ထောင်စုမှီခို အချက်အလက်များ System ထဲသို့ ထည့်သွင်းခြင်း။
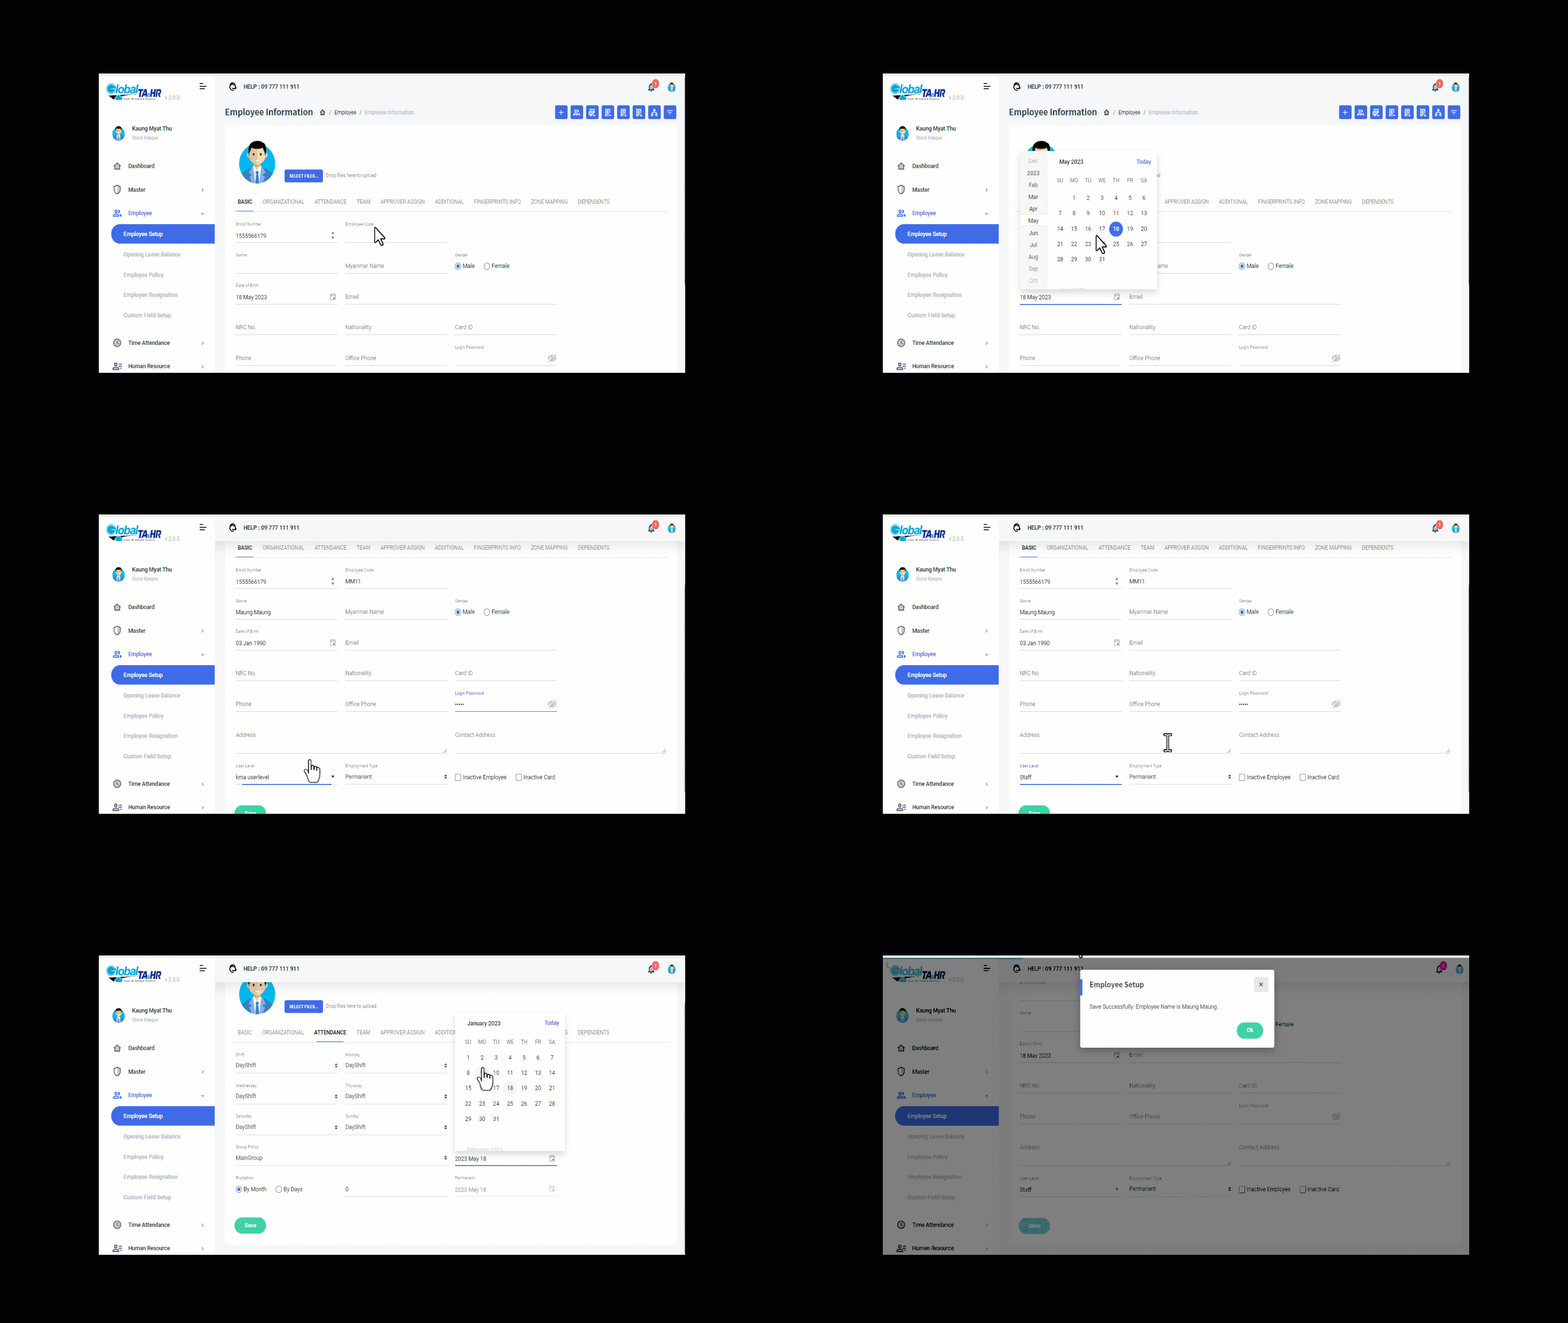
For Log In Setup
Click + Add New >> Fill the Employee’s Data
Essential Fields
1.Enroll Number
2.Employee Code
3.Name
4.Date of Birth
5.Login Password
6.User Level
7.DOE(Join Date)
>Click Save
Log in Setup
For Employee Data Excel Import
In Employee Information Page:(Employee>Employee Setup)
Step 1: Click the Download Template Icon ![]() (The Excel file will drop in Download Folder.)
(The Excel file will drop in Download Folder.)
Step 2: Open the Downloaded excel template file named EmployeeInformation.
Step 3: Fill the Employee’s Data
Essential Fields
1.EnrollNumber,
2.EmployeeCode,
3.EmployeeName,
4.Password,
5.DOE
6.DOB
7.ProbationPeriod
8.ProbationType
*Can’t import if one of the essential fields has blank data.*
Default Fields(System Default name would be inserted if the excel data is blank.)
1.Section
2.Group
3.CostCenter
4.GroupPolicy
5.Shift
6.Division
7.Location
8.UserLevel
9.Company
10.Department
11.Designation
12.Grade
Step 4: Click the Import icon ![]() .
.
Step 5: Click Browse File >> Find the file and Double click on the file or select the Excel data file and Click Open.
Step 6: Click Validate Data.
Step 7: Click Import Data
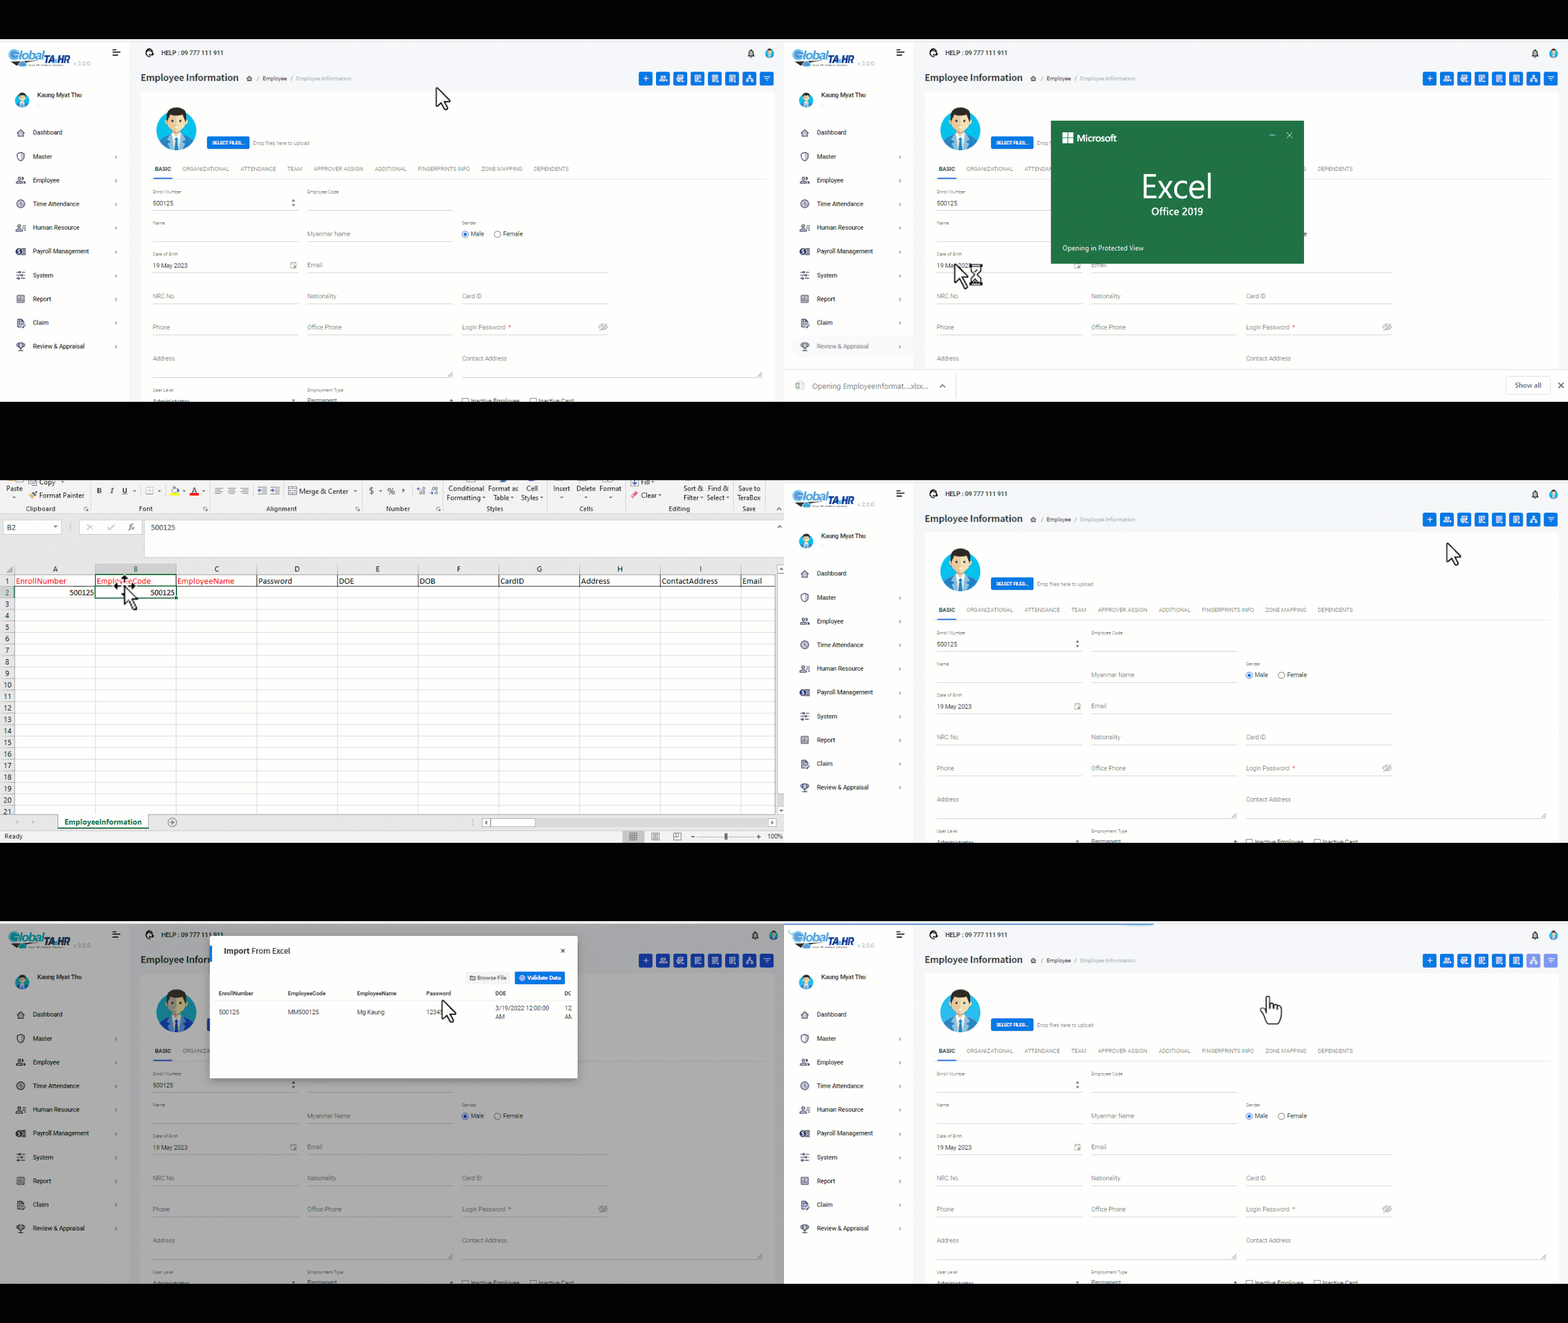
**Administrator is a system default of UserLevel**
**Excel must be in a general format, please change to General if the cells have the formula**
**If the Excel data has an error, the error code will be shown the red words and the Import Data button doesn’t show.**
For Dependent Data Excel Import
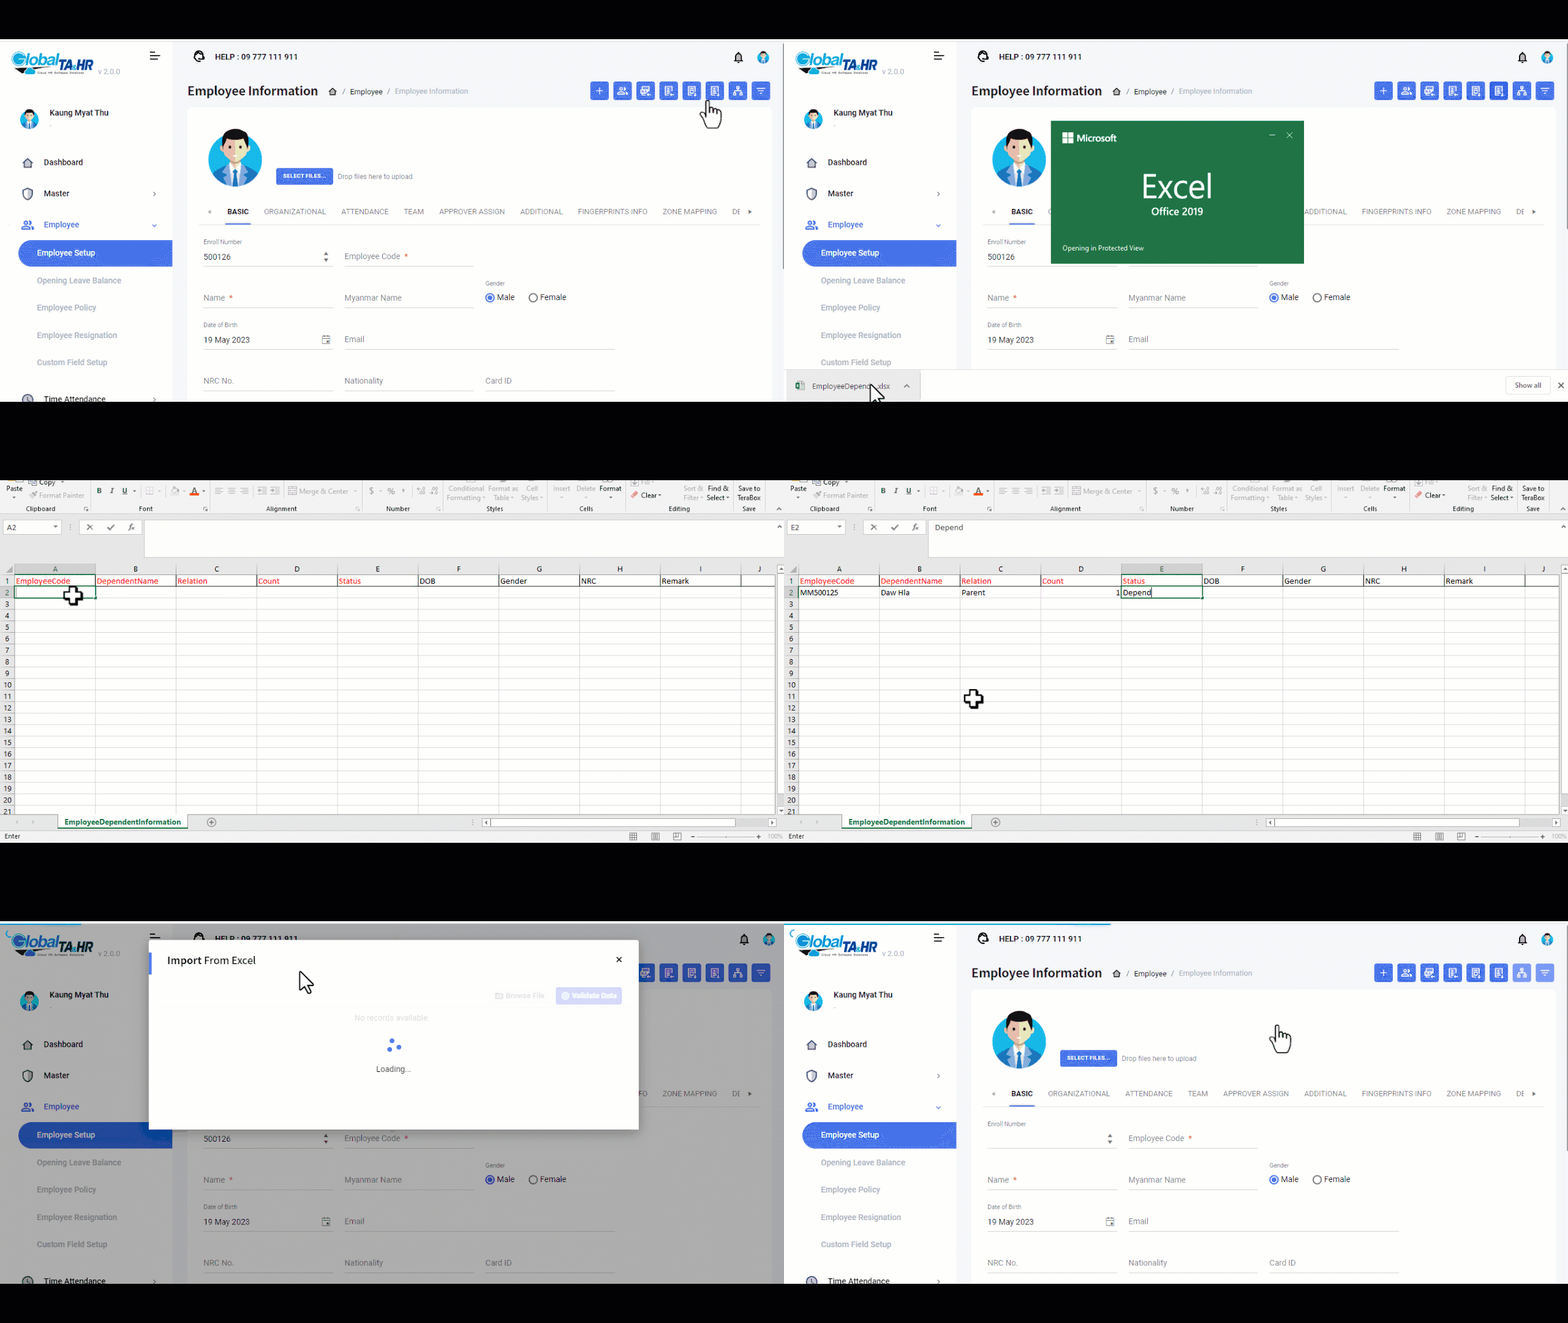
In Employee Information Page: (Employee>Employee Setup)
Step 1: Click the Download Dependent Template Icon ![]() (The Excel file will drop in Download Folder.)
(The Excel file will drop in Download Folder.)
Step 2: Open the Downloaded excel template file named EmployeeDependentInformation.
Step 3: Fill the Employee’s Dependent Data.
Essential Fields
1.EmployeeCode
2.DependentName
3.Relation
4.Count
5.Status
Step 4: Click the Import Dependent icon ![]() .
.
Step 5: Click Browse File >> Find the file and Double click on the file or select the Excel data file and Click Open.
Step 6: Click Validate Data.
Step 7: Click Import Data
Update List
1.New Tab Menu
CHECK IN/OUT SETUP
Mobile Appမှ check in/out ကို ယခု Employee Setup form ရှိ CHECK IN/OUT SETUP မှ
၀န်ထမ်းတစ်ဦးချင်းအတွက် Bluetooth/ Normal/ GPS ဆိုပြီး မိမိ နှစ်သက်ရာ option နှင့် ရွေးချယ် သတ်မှတ်နိုင်ပါသည်။ ထို့အပြင် ဓာတ်ပုံကိုပါ ရိုက်ခွင့် ပြု/မပြုကိုပါ သတ်မှတ်နိုင်ပါသည်။
To configure check-in/out settings for individual employees using the mobile app, follow these steps:
- Open the Global HR Cloud Web URL in a web browser.
- **Step 1: Employee Setup in System**
- Navigate to the “ Employee” section.
- Click on the “ Employee Setup” form.
- Choose the specific employee for whom you want to set up check-in/out.
- Select the “ CHECK IN/OUT SETUP” option.
- **Step 2: Choose Configuration Option**
Choose one of the following options based on your preference:
Bluetooth:
– Select “ Bluetooth” option.
– Configure photo settings as needed.
Normal:
– Select “ Normal” option.
– Configure photo settings, including the option to use OT Check in/out Photo.
GPS:
– Select “ GPS” option.
– Configure photo settings, including the option to use OT Check in/out Photo.
Sample Videos
Watch the sample videos below to see the effects of each configuration option:
Bluetooth Only : Demonstrating the Bluetooth function.
Normal Only : Demonstrating the Normal function.
GPS Only: Demonstrating the GPS function.
2.New Information Fields in BASIC
Text Box list
- Title
- Father Name
- Viber
- Telegram
- Line
New Alert
Probation Alert
Probation Alert ဆိုတာသည် သတ်မှတ်ထားသည့် အစမ်းခန့် ရက်အတွင်း(မိမိစိတ်ကြိုက် ရက် သတ်မှတ် နိုင်ပါသည်) ၀န်ထမ်းအသစ်များရှိလာပါက ထို၀န်ထမ်းများကို စီမံခန့်ခွဲရသည့် သက်ဆိုင်ရာ Approver Level များ ဆီ Mail အဖြစ် ပို့ပေးပါသည်။ အသုံးပြုမည်ဆိုပါက သက်ဆိုင်ရာ Approver Level များ၏ Information တွင် ဖြည့်ထားသော mail ဆီသို့ ပို့ပေးမည်ဖြစ်ပြီး မည်သည့်ရက် တွင် သိချင်တယ် ဆိုတာကိုတော့ အသုံးပြုသူဖက်မှ Global HR Solutions Co.,Ltd ကိုအကြောင်းကြားပေးရန်လိုပါသည်
3.New Approver Option
Allow Approving Profile
ကိုယ်ရေးကိုယ်တာအချက်အလက်များကို Mobile Appမှ တဆင့် ပြောင်းလဲ သတ်မှတ် လိုက်ပါက ထိုအပြောင်းအလဲကို အတည်ပြုလက်ခံမည့်သူများဖြစ်လာရန်အတွက် သတ်မှတ်ပေးသည့် option ဖြစ်ပါသည်။

